Wednesday, July 30, 2014

Unity 3D and Phidgets: Weather Underground app

Looking to have a little fun with my Phidgets displays, and provide some relatively useful functionality, I decided to make a little weather app. This app grabs weather data from Weather Underground at regular intervals for as many ZIP codes as you'd like, then displays the data on a Phidgets Text LCD device. It's not terribly complicated but it is a nice way to show the Text LCD functionality as well as using the .NET WebClient class in Unity and some simple XML parsing.

First things first: do your basic Phidgets setup in a Unity project. If you'd like to peruse the Phidgets Text LCD tutorial that I wrote a while back, that will give you a little background on the hardware commands, although we'll touch on that here as well.

Also, you'll need to set up a Weather Underground developer account to get access to your personalized API key.

So, you should at this point have a Weather Underground API key and a basic Unity project ready to go. We're going to keep this all very simple and you can expand on it as you like.

First, I'm going to set up a script to handle communication with my display. Create this script and drop it on to a GameObject in your scene (I called mine "DisplayController").

using Phidgets;
using Phidgets.Events;
using UnityEngine;
using System.Collections;

public class DisplayController : MonoBehaviour
{
    private TextLCD lcdDisplay= new TextLCD ();
    private bool lcdDisplayIsAttached = false;
  
    void Start ()
    {
        lcdDisplay.Attach += new AttachEventHandler (lcdControl_Attach);
        lcdDisplay.Detach += new DetachEventHandler (lcdControl_Detach);
        lcdDisplay.Error += new ErrorEventHandler (lcdControl_Error);
      
        lcdDisplay.open ();
    }
  
    void lcdControl_Attach(object sender, AttachEventArgs e)
    {
        Debug.Log ("Display attached.");
        lcdDisplay.open ();
        lcdDisplay.screens[0].Backlight = true;
        lcdDisplay.screens[1].Backlight = true;
        lcdDisplay.screens[0].ScreenSize = TextLCD.ScreenSizes._2x20;
        lcdDisplay.screens[1].ScreenSize = TextLCD.ScreenSizes._2x20;
        lcdDisplay.screens[0].initialize ();
        lcdDisplay.screens[1].initialize ();
        lcdDisplayIsAttached = true;
        WriteMessageToDisplay ("*** INITIALIZING ***", "***   PROGRAM    ***", false);
    }
  
    void lcdControl_Detach(object sender, DetachEventArgs e)
    {
        Debug.Log ("Detached.");
        lcdDisplayIsAttached = false;
    }
  
    void lcdControl_Error(object sender, ErrorEventArgs e)
    {
        Debug.Log ("Phidgets display error: " + e.ToString ());
    }

    public void WriteMessageToDisplay (string topLine, string bottomLine, bool centerText)
    {
        string topPadding = "";
        string bottomPadding = "";

        // Make sure strings are not too long.
        if (topLine.Length > 20)
        {
            topLine = topLine.Remove (19, topLine.Length - 20);
        }

        if (bottomLine.Length > 20)
        {
            bottomLine = bottomLine.Remove (19, bottomLine.Length - 20);
        }

        if (centerText)
        {
            if (topLine.Length <= 20)
            {
                int amountOfPaddingToAdd = (20 - topLine.Length) / 2;
                for (int i = 0; i < amountOfPaddingToAdd; i++)
                {
                    topPadding += " ";
                }
            }

            if (bottomLine.Length <= 20)
            {
                int amountOfPaddingToAdd = (20 - bottomLine.Length) / 2;
                for (int i = 0; i < amountOfPaddingToAdd; i++)
                {
                    bottomPadding += " ";
                }
            }
        }

        string formattedTopLine = topPadding + topLine;
        string formattedBottomLine = bottomPadding + bottomLine;

        if (lcdDisplayIsAttached)
        {
            lcdDisplay.screens[0].Backlight = true;
            lcdDisplay.screens[0].rows[0].DisplayString = formattedTopLine;
            lcdDisplay.screens[0].rows[1].DisplayString = formattedBottomLine;
            lcdDisplay.screens[1].Backlight = true;
            lcdDisplay.screens[1].rows[0].DisplayString = formattedTopLine;
            lcdDisplay.screens[1].rows[1].DisplayString = formattedBottomLine;
        }
    }
  
    void CloseDisplay ()
    {
        lcdDisplay.close ();
        lcdDisplay = null;
    }
  
    void OnApplicationQuit ()
    {
        CloseDisplay ();
    }
}


Let's go through this quickly; if you've followed the Unity Text LCD tutorial there isn't much new here.

We create a new Phidgets TextLCD () device to be able to communicate with the display, and a bool to keep track of when it is attached. We could instead check TextLCD.Attached before we try to communicate with it; this is just another way to go about it.

In Start (), we attach our event handlers and open the device for communication. In our event handlers, we're doing some simple initialization when it's attached (turning on the backlight, clearing the display, etc.), setting the attached status when it's detached, and logging errors as needed. Note that in lcdControl_Attach (), we set the screen size (number of lines by number of columns) -- this is critical. This size must be set before you send any text to the display. We are using a 2x20 display, so you'll need to change this if you have a different size.

WriteMessageToDisplay () is a public method we'll use from other methods to send text to the display. We've allowed for two lines, and a bool to decide if we want to center the text or not. We limit the text size to 20 characters, because if we go over, we'll throw an exception; again, change your text size to accomodate the size you need. If we do want the text centered, we look at the max text length minus the current length, and pad half that length to the beginning of the string. Then, as long as the display is attached, we set our backlight and shoot the text over to the display. Note also that we are talking to both displays on the controller; if you'd like to have identical output on two displays, this is already taken care of.

Finally, CloseDisplay () gets rid of the TextLCD object cleanly, and it gets called when the application is exited. If we don't do this (and, in my experience, even sometimes when we do), the application will hang when you exit.

So now we have a script that is capable of talking to the display. We need a script that can grab this weather data for us. Again, I made an object in my scene (this time called "WeatherController") and attached the following script to it.

using UnityEngine;
using System.Collections;
using System.Net;
using System.Xml;
using System.IO;

public class WeatherController : MonoBehaviour
{
    // Weather Underground API settings
    private const string WEATHER_UNDERGROUND_API_KEY = "abc123";

    public string[] ParseWUndergroundData (string zipCode)
    {
        // Form the proper URL.
        string inputXML = "http://api.wunderground.com/api/" + WEATHER_UNDERGROUND_API_KEY + "/conditions/q/" + zipCode + ".xml";

        string place = "";
        string weather = "";
        string temperature = "";
        string relativeHumidity = "";
        string windDirection = "";
        string windMPH = "";

        bool fullNameRetrieved = false;    // Need to use a flag. There are two "full" XML elements; we just want the first.

        WebClient webClient = new WebClient ();
        string weatherData = "";

        try
        {
            weatherData = webClient.DownloadString (inputXML);
        }
        catch
        {
            Debug.Log ("Could not receive XML document from Weather Underground.");
            return null;
        }

        using (XmlReader reader = XmlReader.Create (new StringReader (weatherData)))
        {
            while (reader.Read ())
            {
                switch (reader.NodeType)
                {
                case XmlNodeType.Element:
                    if (reader.Name.Equals ("full") && !fullNameRetrieved)
                    {
                        reader.Read ();
                        place = reader.Value;
                        fullNameRetrieved = true;
                    }
                    else if (reader.Name.Equals ("weather"))
                    {
                        reader.Read ();
                        weather = reader.Value;
                    }
                    else if (reader.Name.Equals ("temperature_string"))
                    {
                        reader.Read ();
                        temperature = reader.Value;
                    }
                    else if (reader.Name.Equals ("relative_humidity"))
                    {
                        reader.Read ();
                        relativeHumidity = reader.Value;
                    }
                    else if (reader.Name.Equals ("wind_dir"))
                    {
                        reader.Read ();
                        windDirection = reader.Value;
                    }
                    else if (reader.Name.Equals ("wind_mph"))
                    {
                        reader.Read ();
                        windMPH = reader.Value;
                    }

                    break;
                }
            }
        }

        string[] formattedData = { "Weather for " + zipCode, place, weather, temperature, "Rel. humidity: " + relativeHumidity, "Wind " + windDirection + " at " + windMPH + " MPH" };

        return formattedData;
    }
}


We'll go over this in a bit more detail, as we haven't touched the WebClient or XML parsing in any other tutorials.

First, we make a string constant to hold our API key. We're going to use this in the URL we build to process a request from the Weather Underground server.

We've got a string array method ParseWUndergroundData () that takes a ZIP code and returns certain weather data. There are lots of fields that it will return. If you'd like to just poke at the API and see everything you can get back, form a URL like this, substituting your own API key and ZIP code:

http://api.wunderground.com/api/API_KEY_GOES_HERE/conditions/q/60601.xml

If you plug in your own API key there, and pop that URL into a browser, you'll get an XML file with a bunch of weather info. I only parse a few fields for the sake of brevity; you can parse any others you want (I'll detail how below).

So, we form our URL using the API key and supplied ZIP code. We get a few variables ready to hold the data that we want. The fullNameRetrieved is a workaround to make our XML parsing similar, and again, there's a couple of ways we could have done this. The problem is that there are two "full" fields that get sent in the XML document. Rather than parsing multiple nodes, I just flag when the first one (the brief name) has been parsed, ignoring the second one. If you wanted, you could structure your XML parsing to be a bit more detailed on node and element names, but again, I wanted to illustrate with simplicity in mind.

Next, we instantiate a WebClient and a string to hold the XML data. You can check out the WebClient class in more detail here if you're interested, but the bottom line is it gets data from a URL. We put that data in a string -- in this case, it's the XML Weather Underground returned to us -- and now it's ready to parse.

We make a new XMLReader, which is used to read data in XML format. We need to give it XML data, and since we're holding that XML data in a string, we'll have to supply the string to the XMLReader in a StringReader. A StringReader is just like a TextReader, which reads text from a file, except it reads a string. We put this XMLReader in a using statement so that once it has finished processing, it will be taken care of by the garbage collector.

Next, we get the XMLReader reading the file. Any time we run across an XML element, we check the name. If it's the name of an element we want to parse, we assign its value to the appropriate variable and continue reading. You can see the element names that I'm grabbing. If you wanted to grab others, you would simply add a string of your choice, then create another "else if" statement with the element's name, and assign the variable properly. Once the reader has finished processing all elements, it will be disposed of (thanks to our using statement).

Finally, we create a new string array containing the data formatted how we want it. Each string in the array will be on a separate line. I've added a little formatting (such as prepending the ZIP code with "Weather for "). Again, however you want your data to display, go ahead and make changes accordingly. We return this string array and we're done here.

Now, we're going to need something to make requests to the web server and collect weather data, then send that data to the display at appropriate times. This is where my MasterController script comes into play. One final time, create an empty GameObject and assign this script to it.

using UnityEngine;
using System.Collections;
using System.Collections.Generic;

public class MasterController : MonoBehaviour
{
    private const float TIME_BETWEEN_UPDATES = 3600f;
    private const float SCROLLING_TIME = 5f;

    private List<string> dataToScrollThrough = new List<string>();

    public WeatherController weatherController;
    public DisplayController displayController;

    private float updateTimer = 0;
    private float scrollingTime = 0;
    private int scrollingIndex = 0;
    private bool applicationPaused = false;

    public string[] weatherZipCodes = { "10001", "60601", "90010" };

    private void UpdateAllData ()
    {
        dataToScrollThrough.Clear ();

        foreach (string currentZipCode in weatherZipCodes)
        {
            foreach (string stringToAdd in weatherController.ParseWUndergroundData (currentZipCode))
            {
                dataToScrollThrough.Add (stringToAdd);
            }
        }
    }

    void Start ()
    {
        UpdateAllData ();
    }

    private void UpdateDataOnDisplay (int indexOfData)
    {
        displayController.WriteMessageToDisplay (dataToScrollThrough[indexOfData], dataToScrollThrough[scrollingIndex + 1], true);
    }

    void Update ()
    {
        if (!applicationPaused)
        {
            updateTimer += Time.deltaTime;

            if (updateTimer >= TIME_BETWEEN_UPDATES)
            {
                UpdateAllData ();
                updateTimer = 0;
            }

            scrollingTime += Time.deltaTime;

            if (scrollingTime >= SCROLLING_TIME)
            {
                scrollingTime = 0;

                if (scrollingIndex > dataToScrollThrough.Count - 1)
                {
                    scrollingIndex = 0;
                }

                UpdateDataOnDisplay (scrollingIndex);

                scrollingIndex += 2;
            }
        }

        if (Input.GetKeyDown (KeyCode.UpArrow))
        {
            scrollingTime = 0;
           
            if (scrollingIndex > dataToScrollThrough.Count - 1)
            {
                scrollingIndex = 0;
            }
           
            UpdateDataOnDisplay (scrollingIndex);
           
            scrollingIndex += 2;
        }

        if (Input.GetKeyDown (KeyCode.Space))
        {
            if (applicationPaused)
            {
                updateTimer = 0;
                scrollingTime = 0;
                applicationPaused = false;
            }
            else
            {
                applicationPaused = true;
            }
        }
    }
}


Personally, I like to create autonomous scripts with easy-to-use interfaces, then create a master object that talks to them. Here, we've got the weather and display controllers, which don't do anything on their own, and the master controller, which tells them what to do. This is nice because it keeps game logic in one place, and lets each script handle only what it needs to handle. There are multiple ways to handle these types of things, but I prefer this for simple programs.

First, we make a couple of const floats that represent times to update the weather and how quickly to scroll through the data on the display. Using these numbers, we're checking weather once per hour, and showing each two lines of weather data every five seconds. We make a generic list of strings to represent the full set of data that will end up getting sent to the displays.

We also make a couple of public declarations for the controllers that we're going to access (the weather and display controllers). We're doing this the simplest possible way here -- we declare an instance of each script as a public variable. In the Editor, we're going to drag the object that has that type of script right on to the appropriate field in the Inspector, so that our Master Controller looks like this:


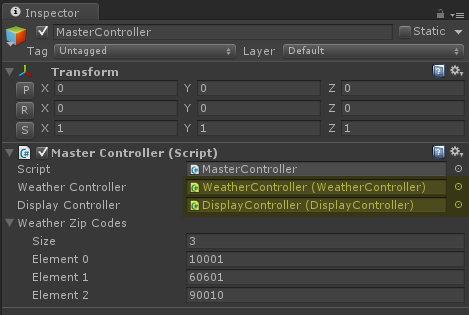
When we declare a public instance of a script we wrote, we just assign that script to an object, then drag the object right on to our public field. Now, when we reference that script in our code, we are talking directly to the script on that object.

Keep in mind that we could have also looked for the appropriate objects in the scene programmatically (for instance, using GameObject.Find ()), but since these objects are static in the scene, this is easy. If you're going to try to talk to prefabs that you instantiate on-the-fly, you won't be able to do this.

Now, we've got some variables for features that we'll explain later, some timers to control when to get weather data and scrolling speed, and an array of ZIP codes we want to check weather data for.

UpdateAllData () clears the current set of weather data strings and gets new ones. For every ZIP code in weatherZipCodes[], we parse the data from Weather Underground. All of these strings get added to our generic list, which we'll scroll through on the display.

In Start (), we call UpdateAllData () to get the balling rolling.

UpdateDataOnDisplay sends two lines of data to the display from our generic list. It accepts the index of the line we want to start at, and displays that line of text plus the next, since we have a two-line display. You could easily modify this to show more lines, in the case that you have a 4-line display.

Update () is where we're doing the bulk of our processing, as is usually the case. First, we update the timer that determines when it's time to get new weather data, provided that the application isn't paused, which we'll deal with later. If the timer gets above our TIME_BETWEEN_UPDATES float, we'll reset the timer and get our new data.

We now do the same for scrolling text. If our timer gets above SCROLLING_TIME, we reset the timer and increment the line of data we want to display next. If we get to the end of the data, we're going to reset our index to 0. We call UpdateDataOnDisplay () with the index of the data we want, then we increment the index for next time -- remember, we're displaying two lines of data at a time, so we want to increment the index by two. So the first time we display data, we'll get lines 0 and 1, then 2 and 3, and so on, until the end of the list, at which point we'll start back over at 0.

Finally, we've got a couple of keyboard commands for usability's sake. Pressing the up arrow will move to the next two lines of data. Pressing the space bar will pause on the current lines of data, or if the application is already paused, it will un-pause it.

We omitted lots of good programming practices to create the simplest example we could. Here are just a handful of changes that could be made, some of which you'd certainly need to do if you were going to use something like this in a released product:

- Make a GUI to accept/parse ZIP codes, control update/scrolling speeds, etc.
- Add error handling (try/catches around hardware communication would be a good place to start)
- Get rid of all magic numbers, such as the max number of characters in WriteMessageToDisplay, and replace with consts or user-configurable values

If you do want to use this, you could also compile it and run it with the "-batchmode" command line switch. This would open the program without any graphical display, letting it just plug away in the background. One nice thing about that is you won't have a crash due to losing the graphics device if you lock your screen.

Thursday, July 24, 2014

Unity 3D and Phidgets: Text LCD displays

LCD displays have a wide variety of applications, from industrial to amusement and redemption games. Phidgets offers a very solid range of displays with plenty of options, and great controllers that can communicate with two at a time. Today, we'll tackle some of the ins and outs of working with them in Unity.

First, you'll want to check out our basic Phidgets setup tutorial to get the hardware talking in Unity. Once you have your DLL loaded and your basic script ready to go, plug in your display controller and move forward.

Like other Phidgets devices, the general pattern is this: you instantiate a new object relating to the type of hardware you want to talk to, you add the event handlers, then you communicate with them. In general, I like to instantiate the device immediately, add the event handlers and open the device in Start (), initialize the device in the attach method, and then communicate with the device in custom methods, making sure the device is attached, of course.

We're going to assume you have one Text LCD controller connected, which will allow you to talk to two displays. Here is the code:

using Phidgets;
using Phidgets.Events;
using UnityEngine;
using System.Collections;

public class PhidgetsController : MonoBehaviour
{
    private TextLCD textLCDController = new TextLCD ();


    private int arbitraryCounter = 0;

    void Start ()
    {
       
textLCDController.Attach += new AttachEventHandler (lcdControl_Attach);
       
textLCDController.Detach += new DetachEventHandler (lcdControl_Detach);
       
textLCDController.Error += new ErrorEventHandler (lcdControl_Error);
       
textLCDController.open ();
    }

    void lcdControl_Attach(object sender, AttachEventArgs e)
    {
        Debug.Log ("Attached text LCD controller. Serial #" +
textLCDController.SerialNumber.ToString () + ".");
       
textLCDController.open ();
       
textLCDController.screens[0].Backlight = true;
       
textLCDController.screens[1].Backlight = true;
       
textLCDController.screens[0].Brightness = 255;
       
textLCDController.screens[1].Brightness = 255;
       
textLCDController.screens[0].Contrast = 200;
       
textLCDController.screens[1].Contrast = 200;
       
textLCDController.screens[0].ScreenSize = TextLCD.ScreenSizes._2x20;
       
textLCDController.screens[1].ScreenSize = TextLCD.ScreenSizes._2x20;
       
textLCDController.screens[0].initialize ();
       
textLCDController.screens[1].initialize ();
       
textLCDController.screens[0].rows[0].DisplayString = "  DISPLAY ATTACHED";
       
textLCDController.screens[1].rows[0].DisplayString = "  DISPLAY ATTACHED";
    }
   
    void lcdControl_Detach(object sender, DetachEventArgs e)
    {
        Debug.Log ("Detached.");

        textLCDController.close ();
    }
   
    void lcdControl_Error(object sender, ErrorEventArgs e)
    {
        Debug.Log ("Phidgets display error: " + e.ToString ());
    }

    void Update ()
    {
        if (Input.GetKeyDown (KeyCode.Alpha0))
        {
            arbitraryCounter++;
            if (
textLCDController.Attached)
            { 

                textLCDController.screens[0].rows[0].DisplayString = "DISPLAY 0";
                textLCDController.screens[0].rows[1].DisplayString = "          " + arbitraryCounter.ToString ();
            }
        }
        if (Input.GetKeyDown (KeyCode.Alpha1))
        {
            arbitraryCounter++;
            if (
textLCDController.Attached)
            { 

                textLCDController.screens[1].rows[0].DisplayString = "DISPLAY 1";

                textLCDController.screens[1].rows[1].DisplayString = "          " + arbitraryCounter.ToString ();
            }
        }


    }
}


Let's go through a bit at a time and explain it all.

As per usual, we're including using statements at the top of our C# script for the "Phidgets" and "Phidgets.Events" namespaces. This allows us to talk to our Phidgets devices and use their event system.

We instantiate a TextLCD () object next. This is the object we'll use for communicating with the device. The "arbitraryCounter" int is just a number we'll increment and display on the screen so you can see that the output is working.

In Start (), we attach our event handlers. These events will fire when the device is attached or detached, or an error is thrown. We then open the device for communication.

The "lcdControl_Attach" method, which is fired when the device is attached, is where we can do our setup and initialization of the device. Keep in mind this will also fire if the devices are already connected when the program starts. First, we log that the device is attached along with its serial number. This is just for debugging, and having the serial number logged is nice if we end up working with multiple devices of the same type, which we touch on below. We open the device -- we opened it in Start (), but we can do it here as well so that if the device is detached and attached while the program is running, we can be sure that it's ready to talk to. We then run the initialization that we want -- here, I've turned the backlights on for both displays, set the brightness, contrast, and screen size, run the initialize () method (which clears all text from the display), and displayed "DISPLAY ATTACHED" on each display.

We should note a couple of things here. One potential gotcha is that you have to set the screen size before you send a string to be displayed. The screen size's default value is none, so if you send a string without setting the screen size, you'll get an exception. The screen that I have is a 2x20, meaning it has two rows, and each row has twenty characters. You'll want to make sure that you select the correct parameter for your display.

Also, notice how we reference each screen and each row. They are 0-based indices, meaning that the first screen/row is 0, and the next is 1. We always have to reference the screen we want to set for backlight, contrast, etc., and we have to reference the row number when we send a string to be displayed. Screens 0 and 1 are marked on the board itself. Rows are indexed from the top, so the top is 0, the next is 1, etc.

In "lcdControl_Detach", we just log that the device was detached, and close it for communication. When the device gets re-attached, the attach event will fire lcdControl_Attach (), where we open it again.

"lcdControl_Error" logs any errors that are thrown by the device.

In Update (), we just wrote a simple little keyboard-controlled test. If you press the 0 key at the top of your keyboard (not the number pad), you'll see the display number and our arbitrary number on screen 0; the 1 key sends the same data to screen 1. Each time you press either of those keys, the arbitrary number is incremented by one, so you'll get a new number each time you hit a button. This confirms that everything is still working.

Notice that we check textLCDController.Attached each time we send a command. This is because if we try to send a command to a device that is not attached, we'll get an exception. Again, pay attention to how we're referencing the screens and rows.

This is a simple test, largely taken from Phidgets' own test C# program, that will get you basic functionality on your LCD displays. While this program is only designed for one controller, one great thing about Phidgets is that you can reference different boards of the same type by their serial number. To do that, you'd just instantiate a TextLCD () object for each device you have, and instead of calling textLCDController.open () with no parameters, you pass it your serial as an int, like so:

textLCDController.open(123456);

This will open that specific controller board for communication. You can get a board's serial number programmatically (TextLCD.SerialNumber), and they are also printed right on the board. For usability, you'll want a place for end users or operators to enter the correct serials, or possibly even work up a calibration routine to assign them to the right spots. We've done all that before with great success, but it's outside of the scope of this article.

Tuesday, July 22, 2014

Unity 3D: Partial Classes with C#

Typically, Unity requires you to have one class per script, which can be a bit of a drag if you've got a larger, more complex class. Did you know that you can split that class up into multiple files using C# partial classes?

The method is simple. Let's say you create a C# script called "PlayerCharacter". You'll have a class generated for you automatically in the .cs file, with contents like so:

using UnityEngine;
using System.Collections;

public class PlayerCharacter : MonoBehaviour{

    // Use this for initialization
    void Start () {
  
    }
  
    // Update is called once per frame
    void Update () {
  
    }
}


We'd like to add a pretty complex bit of code just pertaining to armor. We'd like to keep it in this class, but we'd like to separate it from the rest of the code in this file. Well, first, add the "partial" keyword before "class" in your declaration:

public partial class PlayerCharacter : MonoBehaviour

Now, go ahead and create another C# script, and call it "PlayerCharacter.Armor". Open it up in MonoDevelop and you'll see something like this:

using UnityEngine;
using System.Collections;

public class PlayerCharacter.Armor : MonoBehaviour {

    // Use this for initialization
    void Start () {
   
    }
   
    // Update is called once per frame
    void Update () {
   
    }
}


We're going to get a parsing error, because we can't have a "." in our class name. Use the "partial" keyword again, and remove the ".Armor" portion of the class declaration, so we're using the exact same declaration we used in the other .cs file:

public partial class PlayerCharacter : MonoBehaviour

Here we have two files that represent different parts of the same class. Keep in mind one important thing: if you're inheriting from MonoBehaviour as we did above, you need to make sure that you don't have your built-in methods (such as "Start ()" and "Update ()") in multiple files. This is a single class spread out over multiple files, so you can't declare something multiple times. In the example above, we would simply remove "Start ()" and "Update ()" from one of the files and be good to go.

You can make as many files as you want, naming them with the convention "className.x". Anything that is declared in any of the files is available when working with any of the other files. For example, if I declare a private bool called "isWearingArmor" in the "PlayerCharacter.Armor" file, I can still access that bool from the "PlayerCharacter" file. It's all one big class, and is treated as such by the IDE and the compiler.

Of course, be wary: if you're making a class that is only convenient to use if you spread it out over a dozen files, you may be trying to jam too much into one class. We're completely disregarding class design considerations (and the associated holy wars) to show this technique. Ultimately, it's up to you to design your classes how you see fit.

Unity 3D and Phidgets: Basic Setup

For those of you out there interested in using Unity for physical computing, I'd like to let you in on a fantastic hardware company: Phidgets. They make everything from LCD displays to motor controllers to I/O boards and more. I've used nearly every type of product they make in products that total thousands of unit shipped, and I've found them to be simple, robust, reliable, and an all-around joy to work with.

This basic setup will get you working with any devices that Phidgets make. There are a few little gotchas in the setup, but once you get to the point where Unity recognizes them, they're quite simple to work with. This article will deal with the universal setup for any Phidgets device, and then I'm going to work up a series on the specifics of each type of device.

We're going to assume some working knowledge of Unity (navigating the various panes, creating objects, etc.) and C#, so there won't be as much explanation on basic topics as usual. If you're not at that point yet, I recommend you check out the Unity Basics, and the BurgZerg Arcade Hack & Slash Tutorial. BurgZerg's is my favorite for going from basic Unity knowledge to working game, learning some very good C# along the way.

Here are the steps we're going to take to get Phidgets working in Unity on a Windows machine:

1. Download and run the Phidgets Installer. This will be required for basic communication with Phidgets devices. Make sure that you get the correct installer for your OS (32-bit or 64-bit). If you're not sure which one you have, you can right-click on Computer from the Start Menu, select "Properties", and look under the System heading. Under "System type", you will see that you have either a 32-bit or 64-bit operating system. If you're going to develop on 64-bit Windows but your production machines will be 32-bit, you'll want the 64-bit installer on your development machine and the 32-bit installer for your production machines.


2. Plug in your device and make sure it is recognized. Whichever Phidget you have, go ahead and connect it, then open the Phidget Control Panel. Do so by opening the taskbar in the lower-right-hand corner of the screen, and double-clicking the little "Ph" icon.


In the Control Panel, you should see an entry for each attached device, as well as the serial and version numbers. If you double-click on a device entry, it will open the test program for that device. Once you're satisfied that your device is recognized and functional, you can close the Control Panel and move on.


3. If you haven't already, create a new Unity project.

4. Copy the Phidget21.NET.dll file to your Assets folder. For the sake of organization, I prefer to make a folder under Assets called "DLLs", and move it to there. If you installed to the default directory, this DLL will be found in either "C:\Program Files\Phidgets" or "C:\Program Files(x86)\Phidgets".

5. Create a C# script to control your Phidgets device. It's really up to you how you do this; I prefer to create a separate script for each type of device. At the top your script, you're going to need to add the following lines of code:

using Phidgets;
using Phidgets.Events;


These lines will allow you to talk to your Phidgets devices and utilize their event system.

That's pretty much it! Now, I have had some issues getting Phidgets to work initially, although once they work, they've always continued to work. Occasionally, I've had to restart after adding the DLL to the Assets folder before any communication would take place. Also, in older versions of Unity, I had to change from the .NET 2.0 subset to .NET 2.0 in Player Settings, but lately I haven't had to. Finally, I've read that some folks needed to add a reference to the Phidgets DLL in MonoDevelop, but personally, I've never had to.

So you can use this method to talk to any Phidgets devices. I'll be tackling some of them in a future series, and this will serve as the basis for all of those tutorials. In the meantime, head over to their site and get your imagination working!

Monday, July 21, 2014

Unity 3D: How to Create a Simple Pop-Up Window with NGUI

Anyone who's read my tutorials knows that I'm a big fan of NGUI. I feel it's the best third-party GUI tool for Unity, but there is a little bit of a learning curve, which is why I've worked out a series of articles on some of the simplest ways to implement oft-needed objects in NGUI. Today, we're going to make a pop-up window.

If you don't already have NGUI, go grab it now (full or free). Also, if you aren't already comfortable with NGUI buttons, you can check out my tutorial here.

Since I just posted an article on linking to a Google Play app to rate it, we'll create a window that does exactly that. Our window will simply ask if the player would like to rate our app, and give them the option to go on the Play Store or close the window. We're also going to make a button that pops up the window, but that is strictly for demonstration.

First, we need to get our GUI set up in the scene. In the toolbar, go to NGUI > Create > 2D UI. This will get us ready to use the NGUI objects.


In your hierarchy, you now have an object called "UI Root." This contains all the base components needed to render the UI, and will be the parent of all of our NGUI objects.

For the window itself, we'll use NGUI's example background object, called "Control - Background". You can search for this in the Project pane, or get it directly at "NGUI/Example/Atlases/Wooden/Control - Background.prefab". Drag it into your scene, right on top of  "UI Root > Camera", making it a child of the Camera object. Your hierarchy will look like this:


This is all we really need for the window itself. You can change the size by clicking the "Control - Background" object and altering "Widget > Size" in the Inspector. You can also select a different sprite by clicking the "Sprite" button in the UISprite properties under the Inspector. If you want a completely different set of images to choose from, select a different atlas by clicking the Atlas button in the UISprite properties under the Inspector.


So we have a basic window, but now we need to add some text. In your toolbar, select NGUI > Create Label.


You want to drag the "Label" object that is created in you scene on to the "Control - Background" object to make it a child of that object, if it isn't already. This way, when you move/hide the pop-up window, the text will move along with it. Also, pay attention to the "Depth" property. You want to make sure the label you just created has a larger Depth number than your window, or your text will be behind it.

Change your label to read what you'd like by changing the "Text" property under the UILabel script in the Inspector. I've gone with "Please rate our app!" Again, we can customize this text in a number of ways, including changing the "Size" property, or selecting a different font by clicking the "Font" button, all under the UILabel script in the Inspector. There are lots of ways to change text; if you're interested, you can check them out here.


So now we have our window and text; next, we need buttons to either rate the app or close the window. Find the "Control - Simple Button" prefab in the Project pane, and drag two of them into your scene, right on top of "Control - Background" to make them both children of the pop-up window, just like we did for the label. Set your depth and position them where you want. Change their text by altering the "Text" property of the Label under each one. Also, give them unique names by selecting each "Control - Simple Button" object and renaming it (either press F2 or right-click and select "Rename"). Here, I've named them separately ("Rate Button" and "Close Button"), and changed their label text to "Sure!" and "No thanks!" We've also played around with the colors a bit.


Now that our window is ready, we're going to use a simple bit of code to open and close it. Keep in mind there are plenty of ways to handle this, but I'm working from what I believe is the simplest point. You can build on this or alter as needed.

First, let's add another button to the scene that will just show and hide the window. Stick this button somewhere, then create a C# script named "TogglePopUp". Double-click on the script to edit it, and paste this into it:

using UnityEngine;
using System.Collections;

public class TogglePopUp : MonoBehaviour
{
    public GameObject popUpWindow;

    void OnClick ()
    {
        if (popUpWindow)
        {
            if (popUpWindow.activeSelf)
            {
                popUpWindow.SetActive (false);
            }
            else
            {
                popUpWindow.SetActive (true);
            }
        }
    }
}


This is a very simple script, but let's go through it quickly. First, we declare a public GameObject. Once we attach this to our button, we'll be able to assign a GameObject to it in the Inspector. This is the object we want to show or hide. Now, we use the OnClick () method to respond to a button press -- this is a default NGUI behavior. Inside OnClick (), we first check to see if the the popUpWindow GameObject has been assigned, because if we try to set anything on that GameObject without assigning it, we'll get an error. The inner if () statement is where all the real logic happens. If the object is active, make it inactive. If it is inactive, make it active.

So drag this script on to the button you're using to toggle the window. Then drag the pop-up window object (in my project it's still called "Control - Background") onto the "Pop Up Window" field under the "Toggle Pop Up" script in the Inspector.


Press Play to run your game. When you click your toggle button, the window should disappear and reappear. This is the basis for your pop-up: your window will be present but inactive when the scene starts. When you need to show it, set it to active. When you need to hide it, set it to inactive again.

Now, combining this tutorial with the button tutorial and the rating tutorial, you can see how to easily build a pop-up window to ask the player to rate your app. Once the player has reached the point where you want to ask for a rating (for instance, after a particular level is finished), you can pop this window up. One button will close the window again, and the other will open your app's store page.

Unity 3D: How to Let a User Rate Your Google Play Store App

Ratings in the Google Play Store can make or break your app. It's critical to allow users to easily provide feedback. Since it is so easy to open a link to your game's page on Google Play, we're going to go a little further and talk about best practices and provide some implementation suggestions.

If you just want the code, here it is:

Application.OpenURL("market://details?id=com.RnRVertigo/");

Now, you'll want to replace my package name (I can do some promotion on my own blog, right?) with yours. So where I'm using "com.RnRVertigo", you would enter your full package name, which can be found in your manifest file or in the Developer Console, at the top of the page, next to your game's name. It will generally have a format like "com.gameName" or "com.companyName.gameName".

All our code is doing is opening a URL to our Google Play Store page. The user can rate it from there. Notice that we're not using the typical "http:\\" or "https:\\" prefix; we're using "market:\\". On Android, this will open this link directly in Google Play. We could also do this:

Application.OpenURL("http://play.google.com/store/apps/details?id=com.RnRVertigo");

This will simply open the Google Play link in a web page, and if they haven't set a default to handle Google Play requests, prompt the user if they'd like to use the browser or the Google Play app. You may have use for this, but I generally avoid it because it potentially adds another step to the user's process, and I always shoot for simplicity. If you'd like some more details on Google's product linking policy, check out their page.

Before we go any further, you should know that Google Play explicitly prohibits us from attempting to manipulate our ratings with incentives, blackmail, etc. From the Google Play Developer Program Policies, pay specific attention to this line:

"Developers must not attempt to change the placement of any Product in the Store, or manipulate any product ratings or reviews by unauthorized means such as fraudulent installs, paid or fake reviews or ratings, or by offering incentives to rate products. "

So, it's perfectly fine to ask, "Would you like to rate this app?" or "Please rate us 5 stars!" while it is against policy to say something like "Rate us 5 stars for a free gem!" or "Give us 5 stars to continue playing!" Yes, I know you've seen very popular games that do it. Just don't. While it's highly unlikely that your app would be pulled from the store, it becomes far less likely that Google would be willing to feature your app or involve you in potentially valuable promotions. Also, it's very off-putting for users, and keeping them happy is the goal, right?

There are an infinite number of ways to implement this, but in general, we should try to be as unobtrusive and respectful of the player as possible. Of course we should stick to the Google Play Developer Program Policies, but here are some guidelines I also follow for myself:

Let the user play for a while before rating. This is kind of obvious, but why should they rate a game they've barely played? Pick a point in the game (i.e., after a particular level or number of rounds) where you feel the user has played enough to form an opinion on the game. I avoid going time-based (i.e., two days after installation) because plenty of people will install a game and not play it for days, weeks, or even months.

Make declining to rate just as simple as choosing to rate. A simple window that says something like "Please rate our app!" with buttons reading "Sure!" and "No thanks!" is sufficient. Keep it simple and uncluttered, and remember to close the pop-up when they click either button -- when they come back to your app, you don't want them to have to close it manually. Adding options like "Don't ask again" is one of those small barriers to play that can add up and turn people off to a game, which brings me to my last point ...

Only ask once. If they went on to rate it, we don't need to ask again. If they don't want to rate it now, they probably don't ever want to. Nagging players to rate your app is a great way to get them to give you a low rating just because you're irritating them.

The bottom line is, do what is best for the player and you can't go wrong!

Friday, July 18, 2014

Unity3D: How to Post to Facebook from your Unity Game

We've shown you a simple way to post to Twitter from within your game; today, we're going to tackle a simple way to post to Facebook. The general idea is the same, but there's a little more setup involved. I'm going to supply a template that will work out of the box, and we'll talk about the specifics afterwards.

Before you get cracking in your code, you're going to need to create a Facebook app to handle sharing from your game. Start by going here to create your app.

Once your app is ready, we're going to use it to publish to Facebook. Much like Twitter, we're going to use Application.OpenURL to send the request to Facebook and let them make the magic happen.

If you've read my other posts, you'll know that I'm a big fan of using NGUI for buttons and the like. If you're not using it, I've written a very simple post on getting started with it. With NGUI, just call the ShareToFacebook () method in the OnClick () method of the button of your choice, passing in the proper parameters.

You may have stumbled across similar code, but nearly all of the examples I've found were forming the URL improperly. Here's what I have, and it works wonderfully:

private const string FACEBOOK_APP_ID = "123456789000";
private const string FACEBOOK_URL = "http://www.facebook.com/dialog/feed";
 

void ShareToFacebook (string linkParameter, string nameParameter, string captionParameter, string descriptionParameter, string pictureParameter, string redirectParameter)
{
Application.OpenURL (FACEBOOK_URL + "?app_id=" + FACEBOOK_APP_ID +
"&link=" + WWW.EscapeURL(linkParameter) +
"&name=" + WWW.EscapeURL(nameParameter) +
"&caption=" + WWW.EscapeURL(captionParameter) + 
"&description=" + WWW.EscapeURL(descriptionParameter) + 
"&picture=" + WWW.EscapeURL(pictureParameter) + 
"&redirect_uri=" + WWW.EscapeURL(redirectParameter));
}

If you've followed our Twitter post, you can see that there is a little more to this. The FACEBOOK_APP_ID comes from the app that you built (I've used a fake one here, so remember to replace it with yours). The FACEBOOK_URL is the URL used for posting to the feed. After that, we get to the meat and potatoes of customizing our content.

linkParameter is the link that will be posted to the wall. For example, you could link to your game's website or download page.

nameParameter is the title of your post. You probably want to briefly describe what it is you're posting (i.e., "I'm playing Game XYZ!"). The name will be a link to the URL described by linkParameter.

captionParameter is the caption of your post. This appears in small type right below the title of your post. It may be a good idea here to give a bit more detail on what you're posting (for example, "New high score!"). 

descriptionParameter is the body of the message. Here, you can give the bulk of your message, such as the score you attained, an achievement you unlocked, etc. 

pictureParameter is a link to a picture you'd like to include in your post. Keep in mind that pictures must be at least 200px x 200px.

Finally, redirectURIParameter is the page the user will be redirected to after publishing their message. This is the parameter that is likeliest to cause you a headache. If you want to go the no-hassle route, just link to http://www.facebook.com/.

Improperly forming your URL or trying to redirect to a domain that is not assigned to your Facebook app are almost always the cause of error 100 and error 191. If you experience either of these, ensure that your URL is being formed correctly by comparing it to the URL redirection example on this page.

If you want to redirect to a page that is outside of Facebook's domain, you'll need to take a couple of extra steps. First, go to your app's page, and select "Settings" from the menu on the left. Click the "Add Platform" button, and select "Website". Under "Site URL", enter the page you want to associate with your app. Now, under "App Domains", enter the domain that page belongs to. So, if you added your Site URL as "www.example.com/index.html", you'll want to enter "www.example.com" under App Domains. Now, your redirect should work as intended.

If you'd like to go more in-depth, you can view the Feed Dialog documentation here. Keep in mind that you can use the Share Dialog, as the Feed Dialog is deprecated, but we're going for simplicity here, and I think this is the quickest and easiest way to get Facebook sharing going.

Tuesday, February 11, 2014

Unity 3D: Easy Draggable Windows with NGUI

If you want to make a panel or window that can be moved around when by the user via their mouse, NGUI makes it extremely simple. We're going to do it in a matter of minutes, and without writing a single line of code to boot!

Let's say you've got a nifty menu window that you want your user to be able to move around. I've used the SciFi example atlases that NGUI comes with to create a simple little window made up of some sprites and a label. It doesn't matter exactly what you use.


I have made all of these elements children of a panel (NGUI > Create > Panel), so that when the panel moves, it all moves.


After we make the window that we want to drag around, we need to add a Collider to the element the user needs to click to drag the menu around. In our example, we want to be able to drag the title bar (the background to the word "MENU") and have the rest of the elements follow. In the example above, it's the "Title Bar" sprite. Add a Box Collider to that element, and resize it so that it's the same size as the element you want the user to click to drag.


Now, there's just one script left to add. It's found in your Project view under "NGUI > Scripts > Interaction." It's called "UIDragObject". Drag that script right on to the object you added your collider to. Click on that object, and scroll down to the settings for the "UIDrag Object (Script)" component in the Inspector.

Notice that the "Target" parameter is not set. We need to tell the script what object we want to move when the user drags their mouse around. In our case, we're going to drag the "Panel" object -- the parent of all the menu objects -- from the Hierarchy to this parameter.


That's all there is to it. Run your scene, grab the title bar, and drag your menu around!

Monday, February 3, 2014

Unity 3D: How to Post to Twitter from your Unity Game

Nobody can deny the power of social media in building an audience for your game. I'm going to be writing a few posts detailing the simplest ways I know of for sharing your game via some popular social media sites; today, I'm going to focus on Twitter.

I create almost all of my buttons with NGUI. If you're not using it, I've written a very simple post on getting started with it. If you're using NGUI, you'll call the ShareToTwitter () method in the OnClick () method of the button of your choice, passing in the text you'd like to share. Regardless, you just need to call this method with the text that you'd like to share, hashtags and all.

private const string TWITTER_ADDRESS = "http://twitter.com/intent/tweet";
private const string TWEET_LANGUAGE = "en";

void ShareToTwitter (string textToDisplay)
{
Application.OpenURL(TWITTER_ADDRESS +
            "?text=" + WWW.EscapeURL(textToDisplay) +
            "&amp;lang=" + WWW.EscapeURL(TWEET_LANGUAGE));
}

So what are we doing here? Well, we're opening a URL, which in this case is the URL that Twitter uses to allow us to post to our account. On a PC, this will open the browser and attempt to post Twitter the textToDisplay parameter. On mobile devices, this will open the Twitter app or the browser, depending on what the user has.

You can build up the textToDisplay parameter however you like; just remember the 140-character limit. Include hashtags, a link, your score, whatever.

Thursday, January 23, 2014

Unity 3D: Awwww, Snap!

These aren't brand new techniques, but they weren't in Unity from the outset, so even some veterans seem to be unfamiliar with them. Unity is able to snap objects to a custom grid, or to one another.

To snap to a custom grid, you can first set up the size of the grid by going to "Edit > Snap Settings." Let's say I have a prefab at a size of (0.5f, 1f, 0.5f), and I want to snap a bunch of instances together on the X and Z axes. I can just set the "Move X" and "Move Y" values to 0.5, and I know that every snap step is exactly one object unit in either direction.

To actually snap, just grab an object and move it while holding Ctrl in Windows or Cmd on Mac. Now, the object will move by the amount you designated in "Snap Settings."

Snapping meshes together is even simpler: just hold Shift + Ctrl or Shift + Cmd and drag an object around by its center. Note that the objects being snapped together both need to have colliders.

Finally, you can snap objects together by vertices. This one's a little more involved but it's great for attaching dissimilar, oddly-shaped or -sized objects. Taken directly from Unity's "Positioning GameObjects" page:

Vertex Snapping
  • Select the mesh you want to manipulate and make sure the Transform Tool is active.
  • Press and hold the V key to activate the vertex snapping mode.
  • Move your cursor over the vertex on your mesh that you want to use as the pivot point.
  • Hold down the left button once your cursor is over the desired vertex and drag your mesh next to any other vertex on another mesh.
  • Release your mouse button and the V key when you are happy with the results.
  • Shift-V acts as a toggle of this functionality.
  • You can snap vertex to vertex, vertex to surface and pivot to vertex.